Batch processing is a game-changer for anyone looking to maximize efficiency in laser engraving and cutting. Whether you run a small craft business or a large-scale production operation, processing multiple items in a single run saves time, reduces material waste, and increases output. This guide will walk you through the essential techniques and software features for mastering batch processing, helping you transform a one-by-one workflow into a streamlined, high-volume production system.
¶ For LightBurn Users
LightBurn provides powerful tools for batch processing and mass production, enabling you to efficiently engrave or cut multiple identical—or similar—items on your laser machine.
¶ Key Features
LightBurn offers several tools to streamline batch processing. The primary tool you’ll use is:
¶ 1. Grid Array Tool
This is the most common and powerful tool for creating multiple copies of a design in a grid layout. It's perfect for arranging many identical parts efficiently on your laser bed.
¶ How to Use It
1). Create the single object or design you want to replicate.
2). Select the design(s) you want to duplicate.
3). Go to Arrange → Grid / Array, or click the Grid Array button in the Modifiers Toolbar.
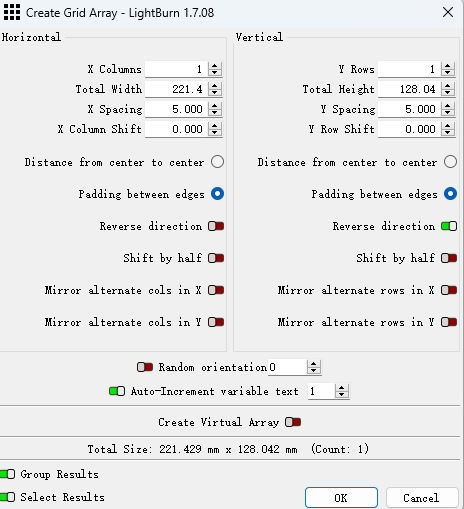
4). In the Create Grid Array window (see Fig. 1), you'll find:
✅ X Columns and Y Rows: Set the number of copies horizontally and vertically.
✅ Total Width and Height: Alternatively, define the total area the array should occupy; LightBurn will calculate the columns and rows automatically.
✅ X and Y Spacing: Set the distance between copies, either “center-to-center" or “padding between edges".
✅ X Column and Y Row Shifts: Offset alternate columns or rows for more complex layouts.
✅ Mirror Alternate Columns/Rows: Flip copies in certain directions to maximize material usage.
✅ Random Orientation: Randomly rotate each copy—useful for natural materials like wood grain.
✅ Auto-Increment Variable Text: Automatically increment variable text (e.g., serial numbers) for each copy in the array—great for personalization.
✅ Create Virtual Array: Generates linked copies so any changes to the original design automatically update all copies, which is especially helpful during iterative design.
5). Click OK to create the array.
¶ 2. Jigs and Fixtures for Placement
While not a feature of LightBurn itself, using jigs (fixtures) is essential for repeatable and accurate batch processing.
A jig is a template, often cut from plywood or acrylic, with precisely positioned holes or outlines that match the shape of the objects you want to engrave.
¶ How to Use It
1). Design Your Jig: In LightBurn, draw the outline of your product. Then, create an array of these outlines using the Grid Array tool, matching the number of items you plan to engrave in a single batch.
2). Cut the Jig: Cut the design out of a scrap material, such as 1/4" plywood or acrylic. This creates your physical template.
3). Align the Jig: Place the jig precisely on your laser bed and use LightBurn's Frame function to ensure perfect alignment with the digital design. You can also add small registration marks on the jig or laser bed for quick, repeatable placement.
4). Place Your Blanks: Insert your blank items into the cutouts of the jig.
5). Load Your Engraving Design: Overlay your engraving design on one of the jig outlines in LightBurn.
6). Create an Array of Your Engraving Design: Use the Grid Array tool again, mirroring the exact spacing and layout of your jig. This ensures each engraving aligns perfectly with its respective slot.
7). Run the Job: Set the jig’s layer to “Tool" or “Output Off“ if you don’t want to cut the jig again. Then start the engraving process.
¶ 3. Variable Text and CSV Import (for Personalized Batches)
If you need to engrave unique text—such as names, serial numbers, or dates—on each item in a batch, LightBurn’s Variable Text feature combined with CSV import is a powerful solution.
¶ How It Works
1). Create a Spreadsheet (CSV File): List all unique data you want to engrave in columns (e.g., "Name", "Serial Number", "Date").
2). Import the CSV into LightBurn: Go to File → Import Variable Text and select your CSV file.
3). Create a Text Object in LightBurn: Type a placeholder (e.g., [Name], [Serial]) or a special format like 0ddd for serial numbers with leading zeros.
4). Set Text Type: In the Text Options toolbar, set the text to “Merge/CSV” or “Serial Number”, depending on your data type.
5). Use the Array tool: When creating your array, enable “Auto-Increment Variable Text”, LightBurn will automatically pull the next line of data from your CSV for each item in the array, ensuring each engraving is unique and correctly aligned.
¶ 4. Optimize Cut Paths
When cutting multiple identical parts, optimizing the cut path can save significant time and reduce material wear.
1). Remove Overlapping Lines: If your array contains shapes that share common cut lines (e.g., a grid of squares), enable the “Remove Overlapping Lines” option in your cut or optimization settings. This prevents the laser from cutting the same line twice, saving time and reducing charring.
2). Order Layers/Objects: Arrange your layers and objects so the laser moves efficiently from one part to the next, minimizing travel time. Use LightBurn’s Optimization Settings to help automate and refine the cutting order for maximum efficiency.
¶ General Workflow for Batch Processing in LightBurn
1). Design a Single Item: Create the complete design for one piece, including vector cuts, fills, images, and text.
2). Create/Align a Jig (Optional but Recommended):
✅ Design and cut your physical jig.
✅ Place the jig on your laser bed.
✅ Align the jig in LightBurn using the Frame function or by matching its digital representation to the physical jig’s position.
3). Array the Design: Use the Grid Array tool to duplicate your single design across your workspace, matching the layout of your jig or maximizing the number of items on your material.
4). Load Material/Items: Place your blank items into the jig cutouts.
5). Set Laser Origin: Choose a consistent job origin point (e.g., absolute coordinates, user origin, or current position) for all batches.
6). Check Preview: Use LightBurn’s Preview window to visualize the full job, ensuring proper alignment and verifying there are no errors.
7). Run the Job: Start the laser operation.
8). Repeat: Once the batch is complete, replace the finished items with new blanks and rerun the job.
By following this workflow, LightBurn enables highly efficient and precise batch processing for your laser engraving and cutting projects.
¶ For RDWorks Users
RDWorks also supports batch processing. By using its built-in Array function and carefully managing layers and processing order, you can efficiently engrave or cut multiple items in a single run.
¶ 1. Creating Multiple Copies with the Array Tool
This is the primary method for batch processing identical items in RDWorks.
1). Design Your Single Item: Create the complete design for one piece, including graphics, text, and any other elements.
2). Select the Design: Highlight all elements of your single item.
3). Use the Array Tool
✅ Locate the Array tool in the toolbar or under the Draw menu.
✅ In the array dialog box, set X Count (number of columns) and Y Count (number of rows).
✅ Define X Spacing and Y Spacing between copies. You can usually choose between center-to-center or edge-to-edge spacing.
✅ Click OK to generate the array of your design.
¶ 2. Optimizing Processing Order for Efficiency
For optimal results in batch processing—especially when combining engraving and cutting—organizing the processing order is essential.
1). Layer-Based Processing: RDWorks executes operations based on the color layers assigned to your design elements. Layers are processed in the order they appear in the Layer panel (usually on the right side).
✅ Prioritize Engraving: Engrave all items before cutting. This prevents parts from shifting or falling out before engraving is complete. Ensure your engraving layers appear above your cutting layers in the list.
2). "Independent Output" for Engraving
✅ For scan (engrave) layers, double-click the layer in the Layer panel to access its settings and locate the Independent Output checkbox.
✅ Enabled: The laser completes the engraving of each individual shape (or grouped shapes) entirely before moving to the next, reducing travel time and minimizing issues like ghosting or vibration.
✅ Disabled (Default): The laser scans line by line across all instances of that layer in the array.
¶ 3. Using Jigs/Fixtures for Repeatability
Physical jigs are essential for precise and repeatable batch processing in RDWorks.
1). Create a Jig Design: In RDWorks, draw the exact outlines of your blank items in the same array layout you plan to use.
2). Cut the Jig: Laser cut this design from a scrap material, such as plywood, to create your physical template.
3). Place and Align Jig: Secure the jig on your laser bed. Use the Frame button on your machine to verify that the outer boundaries of your array perfectly align with the jig.
4). Place Items: Insert your blank items into the jig cutouts.
5). Load Your Engraving Design: Overlay your engraving or cutting design onto one of the jig outlines in RDWorks.
6). Array the Engraving Design: Use the Array tool to duplicate the design, ensuring that spacing and dimensions exactly match your jig layout.
7). Run the Job: Set the jig’s outline layer to “Output Off” so it isn’t cut again, then start the laser process.
¶ 4. Serial Numbering / Variable Text (Limited)
RDWorks offers basic capabilities for variable text, primarily for simple numbering.
- Serial Numbering: Using the Serial Number function (found under the Text Tool Process), you can define prefixes, suffixes, starting numbers, and increments. When applied to a text object within an array, RDWorks automatically assigns a unique serial number to each item.
- Data Import: RDWorks has limited ability to import complex variable data from external files (e.g., CSVs with multiple columns of names or codes). For advanced personalization, users typically export individual files or manually edit text fields.
¶ General Workflow for Batch Processing in RDWorks
- Design One Item: Create the complete graphic or design for a single piece.
- Create an Array: Use the Array tool in RDWorks to duplicate your design into a grid that fits your material or jig layout.
- Prepare a Jig (Highly Recommended): Cut a physical jig matching your array layout and place it accurately on the laser bed for repeatable positioning.
- Load Blanks: Insert your items into the jig cutouts.
- Set Layer Order and Settings: Arrange layers so engraving layers come before cutting layers. Adjust Independent Output for engraving layers as needed to minimize travel and ghosting.
- Set Origin: Choose a consistent laser origin point to ensure accurate placement for all batches.
- Simulate/Preview: Use the Simulate or Preview function to verify the laser path, spacing, and design alignment.
- Send to Machine: Download the file to your Ruida controller or run the job directly from the PC.
- Start Job: Press Start on the machine and monitor the process for quality and safety.
RDWorks offers robust tools for batch processing, making it efficient and reliable for production runs of multiple engraved or cut items.
¶ For EzCad Users
EzCad supports batch processing, though its workflow and features may differ slightly from software like LightBurn—particularly when handling complex variable data. With careful use of its array functions, layer management, and text tools, you can efficiently engrave or cut multiple items in a single run.
¶ Key Features
¶ 1. Array Tool
This is the most fundamental tool for creating multiple identical copies of your design. Here is how to use it:
1). Create your design, including graphics and text.
2). Select the design(s).
3). Access the Array tool via the Draw menu or the toolbar icon.
4). In the array dialog box, set X Count (columns) and Y Count (rows), and define the spacing between items.
This generates a grid of your designs, allowing you to engrave or cut multiple items in a single run.
¶ 2. Layer Management & Processing Order
EzCad uses layers to organize design elements, and the laser processes layers in the order they appear.
1). Prioritize Operations: For efficiency, place all engraving/fill layers before cutting or contouring layers. This ensures surfaces are marked before parts are cut out and potentially shift.
2). Layer Parameters: Each layer can have unique settings for power, speed, frequency, and fill style, enabling different effects across various parts of your batch.
¶ 3. Hatch Settings
When engraving filled areas, EzCad provides a variety of hatch patterns that affect both efficiency and the final appearance.
- Available Hatch Types: Unidirectional, bidirectional, crosshatch, ring fill, and more.
- Choosing the Right Hatch: Experiment with different patterns to achieve the best results on each material. The choice of hatch influences engraving speed, detail, and how evenly the surface is marked.
¶ 4. Variable Text & Data Import
EzCad excels at personalized batch processing, with several options for dynamic text:
1). Serial Numbers: Define prefixes, suffixes, starting numbers, increments, and character formats (decimal, hexadecimal, etc.). When used with an array, each item automatically receives a unique serial number.
2). Date/Time Stamps: Insert dynamic date and time stamps that update automatically for each mark.
3). Keyboard Input: Manually input text for each item during marking.
4). List File/CSV/TXT Import: EZCAD supports importing data from external files, typically TXT files or older Excel (XLS) files, for variable text.
✅ How It Works: Create a text file (e.g., .txt) or an older Excel file listing names, codes, or other data. Then link a text object to this file. During marking, EzCad pulls one line of data per array item or per subsequent mark.
✅ Note: Some EzCad versions prefer plain .txt files or require older Excel formats. Modern CSVs may need to be saved as tab-delimited text files or older Excel versions for compatibility.
¶ 5. I/O Control & External Devices
EzCad can integrate with external devices via I/O signals, which is particularly useful in industrial settings:
1). Automated Feeding: Triggers a feeder to present the next part for marking.
2). Foot Pedals: Starts marking manually using a foot pedal, allowing precise part placement.
3). Continuous Marking: Sets up jobs to run continuously, enabling operators to swap parts efficiently without stopping the machine.
¶ General Workflow for Batch Processing in EzCad
1). Design Master Piece: Create the complete design for a single item, including any text placeholders, serial number objects, or variable text elements.
2). Create an Array: Use the Array tool to duplicate your design across the workspace, based on how many items fit on your marking area or jig.
3). Prepare Variable Data (if needed)
✅ For serial numbers, configure the serial number object.
✅ For external data (names, codes), prepare your .txt or old .xls file.
✅ Link the variable text object in EzCad to your data file.
4). Optimize Layers: Arrange the layer order (e.g., engraving first, then cutting) and adjust parameters such as power, speed, frequency, and hatch type for each layer.
5). Use Jigs/Fixtures (Recommended for Precision)
✅ Create a physical jig to hold multiple items in the same layout as your EzCad array.
✅ Place the jig on your machine's workbed.
✅ Use the red light preview to ensure your digital array perfectly aligns with your physical jig and the items within it.
6). Set Origin: Choose your laser origin point for consistent placement across all batches.
7). Test Marks (Optional but Recommended): Perform a low-power frame or a very light test mark on scrap material to confirm alignment.
8). Start Marking: Send the job to the machine and start marking.
EzCad’s robust capabilities, particularly its variable text functions and integration with industrial controls, make it a powerful solution for batch processing in laser marking applications.